Saturday, December 6, 2014

CAS (clean and simple) Impression Obsession Holiday Cards

Today I was inspired (again) by Kittie Caracciolo  and her lovely, simple, elegant cards... and decided to do a couple CAS Impression Obsession Holiday Cards. I will be entering them in the contest over at the Impression Obsession Blog. Fingers crossed! LOL


Holiday Bird Watching
This first card is some fun with die cuts and thinking like a cat... with birds on the sill.
I decided to go with a 5 1/2 x 5 1/2 inch size card with some nice merlot, celery and white for colors. 
The Dies used were all from Impression Obsession    (http://www.iostamps.com/)
Large Window with Window Box set: DIE103-ZZ 
"Thinking of You" is in the Greetings Top Edgers word set (3 words): DIE234-M
Cat set (6 kitties): DIE083-K
Small Birds Set (10 little birds) DIE154-A
Fancy Tree set (2 trees) DIE031-N
The trees were stamped green on light green with The Fluff Cover-A-Card stamp CC104


Snowy Night
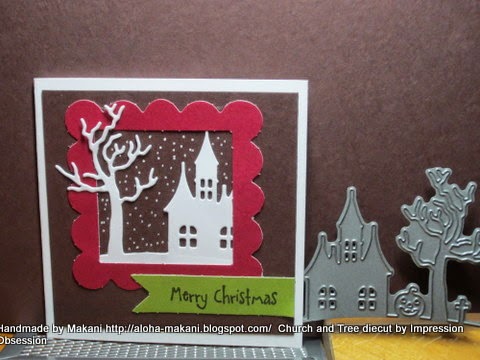
My second card is a little darling  little 3 1/4 x 3 1/4 inch card. I got the idea of cutting off stuff from the Haunting Hill and using the church and house as something not Halloween from Cindy at the Impression Obsession booth at the Rubber Stamp Convention a few weeks ago. So many ideas have been flowing in since... 
The house and tree are parts of the bigger landscape die called Halloween Hill DIE029-P
The snow is just dots using my new Sharpie White Extra Fine Point Water-Based Pen- worked great!
The scallop square is from some old scrap Stampin' Up! Paper
I am sorry, I can't remember where I got the little words "Merry Christmas" from. 

The best thing is that all the IO dies cut sooooo well! I love how they are made and work so well. Thanks Impression Obsession!


Anyway... thanks for looking. Hope I've inspired you. 
Happy crafting,
Makani


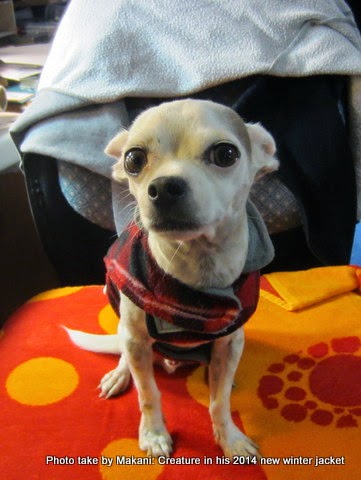
PS Merry Christmas from our little neighbor dog, Creature. He's loving his new lumberjack tartan fleece winter coat from Auntie Makani. 

Love, Creature "woof" 
Wag, wag, wag, wag, wag... 

Saturday, November 29, 2014

The Fog in the Trees and Popping Up Fun

So... I've been inspired again... this time by an Impression Obsession Cover-A-Card Stamp called Pine Trees     Here's what that stamp looks like:
Cover-a-Card Pine Trees

I also was inspired by the landscape where I live (ah paradise).


These sunrise pictures were from two days ago and the fog pic was taken by my son not long ago. These are common sights. Nice.

And below is the card I made...  "Trees Through the Fog"

The rolling fog is done by daubing different hues of gray ink on the edge of a torn piece of paper shaped to look like rolling hills. To get the layered effect, you have to play around and re-position it a bit.

To make the trees look darker- more like shadows- I double or triple stamped them. The trees are are from 3 companies:
1) Stampin' Up! Lovely as a Tree
2) Ink-adink-ado
3) Rubber Stampede
I drew in the little tree tips because it was hard to get the stamps to work. My son thinks I should take an art class, because I have potential- awww... Hmn, maybe.

Trees Through the Fog                         


The other inspiration came from the SplitCoastStampers Challenges- just gotta love how they help get the creative juices flowing!

The sketch was to use layered die cuts TLC509... Here are my works of art:

Tree of Trees and Gems
This one was all die cuts and a bit of bling and string. 
The trick to make the candy cane from the baker's twine is to rub some Modge Podge 
(it's like glue) on them, shape them, then let them dry on a non-stick cookie plastic sheet.


Beary Merry Christmas
This one involves stamping the cute bear "Grizz" by Judith Stamps, the tree by Amuse Stamps, and the words from an old Stampin' Up! set called Warm Words. I added the "Love, Bear!"
The die cut pail (with handle!!) on some silver foil poster board paper is made 
by Impression Obsession. The ornaments and the star are all from the retired 
Stampin' Up! Merry Mini punch set and on foil poster board paper- I had to make the green one by coloring a silver ornament with a green alcohol marker. Gotta love those makers!


Cocoa for Two and Two for Cocoa, You for Me and Me for You... 
This last one combined the same layered die cuts from the retired SU! Scentsational Season dies
and matching stamps set and SU! Season of Style Designer Paper. 
The cute little penguins and the saying are from Ink-adink-adoo. Penguins get me everytime!
I was inspired for the layout by the SCS sketch challenge SC516


Well, that's it for now! Hope I inspired you!
Happy creative crafting and playing! 
Makani

PS I post more pics on my SplitCoastStampers (SCS) gallery than here- go see more here:


Sunday, November 23, 2014

Soda Can Butterfly, Scenes from my Window, and Starlight Starbright!!

Thank you Kat at A Stamp in the Hand for once again hosting the Rubber Stamp Convention in the San Jose, CA area!  Here are a few of my inspired works...

Soda Can Butterfly
Tessler Stamps had a great demo once again at the convention for this... but when I got home and wanted to do it... I couldn't find a video on it anywhere... so after a dozen failed attempts today, I figured it out. Then I videotaped how to do it and loaded it to YouTube so next time I won't forget how!  Check out my video here.... Soda Can Butterfly by Makani (and if it helped- vote you like it!)

And you will see how to make some lovely butterflies...

I included the recipe at the end of the video... but I will paste it here too:
How to Make a Soda Can into a Butterfly- Using a Big Shot or Vagabond (or Cuttlebug)
Recipe from the bottom up...
1) Magnetic plate (for Cuttlebug- use A plate + C plate)
2) “B” sized (thinner) acrylic plate
3) Metal shim plate
4) Card stock
5) Fun foam
6) Soda can – print side up – toward the blade
7) Wax paper
8) Butterfly die- blade down
9) “B” sized (thinner) acrylic plate
10) Brush with a toothbrush or a Spellbinders Tool ‘n One to remove small pieces


Making Designer Paper from Background Stamps
and View from my Window... 
The second inspired work was from the Impression Obsession Booth- love your work Kallani Allred and all your help Cindy! I bought a lovely Cover-A-Card background stamp of a winter scene and some wonderful die cuts of little deer, a window with panes, and some phrases that pop up... to create this. (Note, the background paper was made with 2 stamps and 3 colors- thin stripes 2x and a vine stamp.)


I was in the mood for window cards this past few weeks- here's another... 


The other theme of the week has been stars- here are a few of my star creations:


This white and silver star card was inspired by my friend Deidre's Noel card.
The paper fan card (aka sunburst or star) is so much fun to make. Great way to use up scraps!!

That's all for now. :)   Makani

Saturday, November 15, 2014

Fun with Popping up and Die Cuts

Here are a few of my recent pop up cards...  Inspired by the Stamps of Life Step Up Die , I cut out my cardstock to make my own Step Up Cards...


 Ta Da! 
This snowman is from Stamps of Life (there is a stamp set and matching dies).


Up! Up! and Away!
The reindeer are from StampDoctor and the Tree die is by Ellenita (from Tessler Stamps)

Here's how I laid out the reindeer on the card folds


Here is the template for the step up cards I made:

Lastly, I figured out quite by accident that if you don't cut a lamp post at the base (forgot to roll it all the way through the machine), you can make it stand up like a pop up.

Well, that's it for pop ups, but here's one last card
It was a 10-minute card I made for a special person in my life. The stamp set is a retired Stampin' Up! set called Just Buzzin' By. (link to the SCS Just Buzzin' By album and my card)


Wednesday, October 29, 2014

House for the Kitties and Down at the Beauty Salon

I made two cards for special people in my life. One is an amazing helper in my work life who loves her two kitties. The other is a sweet woman who fancies up my hair.

Check it out.... (and be sure to count how many kitties there are on the outside and inside of the card... the number was specific) :)
The little house is a Magnolia House. Tim Holtz Lamp Post. Die-Namics fence.
The little barrel, plants and saying are are Rubber Necker. 
The bench and mailbox stamps- unknown. The grass punch is Martha Stewart. 
The die cut kitties are a mix of Poppy Stamps and Impression Obsession.

I even made the gate open and latch closed! (I used dried Mono Liquid Glue to make it latch)


 Brown kitty is in the flower bed barrel. Purrr.
I also had fun making the flame in the lamp.

Inside the card, I put these two kitties in a window wondering where their mom was.
(Window die is Poppy Stamps)

And then I gave her a little mini envelope of kitties (with a vellum window). 
I drew the details on this kitty... not bad for a quick sketch. :)

So, did you count the kitties? 9! as in 9 lives!!

This kitty card was submitted to 
Crafty Card makers Punches and Dies 


Here's the other card I made for my hair stylist.... 
As she applied the perfect amount of highlights to my hair I realized I had to make her this card... 
Here's the outside.... 
(Stampin' Up Deco Labels framelit die and Itty Bitty heart punch)

Here's the inside... 
Yup, I finally used one of my Girlfriends stamps set from Art Impressions I picked up a year ago. 
I love all the sayings too... Pamper yourself! Definitely a good thing to do!
 The "I think your Lovely" and "Live Happy" sayings are Stampin Up.
"Dream your dream" was from a roller stamp- unknown company.
The top cut on the card was made with the Stampin' Up! Adorning Accents Edgelit die.

The crown was made with SU! gold paper and the SU! Pinking Hearts Border Punch.


Touch of Pearls for some class on die cut leafy branch from Cheery Lynn Designs.

I made the dried Mono Liquid Glue latch in the shape of a heart. She noticed it right away. 


Of course I added glamourous jewelry - pearl earring and ring and gold bracelet and earring!

The little hearts came from the SU! Pinking Hearts Border Punch leftovers.
The Word Bubbles are a Stampin' Up! framelit die set.

And lastly, she told me about her little doggies. One of which loves to have her hair blown dry.
So I had to use a couple of doggies from Ailee Busby's Paw Prints.
She said these dogs were just like her doggies. Nice. 

These two cards took me all afternoon and into the night... but it was so much fun. 
And both of the women loved their gifts!
That's what makes it all so worth it!

LOVE to all,
Makani


Sunday, October 26, 2014

Oh what to do with a wreath!

At first I thought I wouldn't buy the new Stampin' Up! Wondrous Wreath and its matching framelit Dies Wonderful Wreath because I have toooo many (is that possible?) Christmas things. But the big cursive Joy and Noel got me and I bought them both as a bundle. Here's a link to the Stampin' Up! (SU!) Holiday Catalog. (If you want anything, please do send me a message- I don't have a merchant page with them... but I can order things for folks and dropship them to your homes easily!)
http://www.stampinup.com/ECWeb/ItemList.aspx?categoryid=1995

Then the next task was to use my new stamps and framelit dies... and that's when I realized you can do ~~anything~~ with a wreath! Here are few of the wreaths I've made so far (I have a bunch more in my idea file to be made later). :)

They all have shiny bows thanks to painting on SU! Crystal effects. 

Two card color layouts. The flowers were made using  the Itty Bitty Flower Punch 
on flowers that I got from SU! Perfectly Preserved. 

Two card color layouts. The leaves were pulled off a leaf garland made of leaves and wire.

The snowflakes came from an edge punch by EK success. 
I sparked them with my clear/sparkle Gelly Roll pen.

The hearts are popped up with a big blob of Liquid Crystal

Half wreaths work perfectly for a garland!
I also used SU! Filigree Frame Embossing Folder and Labels Collection Frames Framelits.

I also had to play around with using the big cursive "Joy" framelit die. Of course I also wanted to use those totally cute little houses from SU! Holiday Catalog: Holiday Home, the matching Homemade Holiday framelit dies, and White Christmas.

Here is a gate card that I call "Christmas Neighborhood Village" 
The house is the "latch" to close the gate card. To allow ample room for "Joy", 
I made the dimensions so that the gates were scored at 3.5 and 9 on an 11.5 x 4.25. 
This awesome red is the Cherry Red Cobbler paper. 


I fussy cut out Santa's sleigh so he could be on the roof top. 
I bent the photopolymer stamp of the reindeer to fit in the moon and stamped those first.
(As much as I've resisted Photopolymer stamps- the Stampin' Up! ones are good quality and I like the things you can do with them (like bend them).)

I like making "latches" for my gate card doors.
Put a dab of Tombow Mono Liquid Glue (green + white bottle) on one side of the little house that is on the gate fold front seam. Let the glue dry- and it becomes re-positionable! (aka re-openable)


And here are the little Fall cards I made for my stamping buddies

I love the SU! Lovely as a Tree stamp set... and hope it never retires. 
I used the old oak as a fall tree by dabbing some Cajun Craze (rust) ink in the leaves (Old Olive) 

I love making motion lines with dots.... only one more leaf to fall.. 

This is a color wonder- I only use one color- Cajun Craze ink drops on a dish and a blender pen.
I like how there are so many hues as a result! 
(sorry for out of focus- I already gave it away, so no retakes!) :)

Thanks for looking! 
Makani